Search for and View Previously Submitted Tickets in the Support Ticket Center
- Monitor the disposition of your tickets
- View/Review a ticket's summary and details
Search for all your active/open tickets
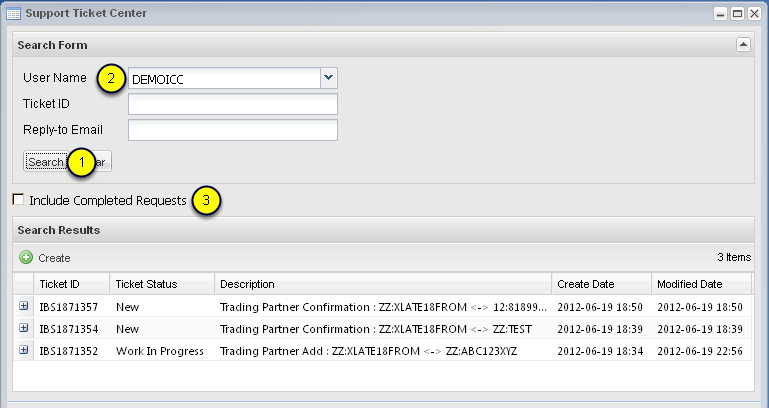
- Load the application and select Search. You do not need to add any additional information.
- Tickets can be returned that were created under your Login ID, another Login ID under your organization, or created with Login IDs that belong to your subsidiaries or sub-accounts. If however your UserId belongs to a "Limited" or "Reports-only" group you will only see your own Login ID.
- By leaving "Include Completed Requests" un-checked, only the active/open tickets are returned. Otherwise when checked tickets that have been resolved or closed for 90 days will be visible too.
Tickets can be viewed for any User ID under you account, subsidiary, or sub-account.
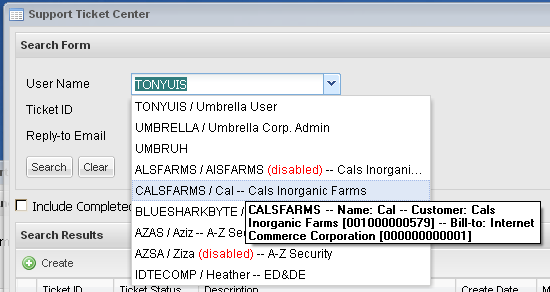
Below is an annotated version of the above image

You may query your own tickets or tickets created by others in your organization, or in organizations where your account is either the Parent account or Bill-to account. Only the User ID is displayed once selected.
(1) Highlighted in orange, when the User ID is under the same account under which your User ID is defined, the format of the expanded selection list is "<User ID> / <User Name>". User name may be blank if it is not defined within the network; see user Umbruh above. Your organization's name is always omitted for brevity.
(2) Highlighted in green, when the User ID is under a subsidiary or sub-account, , the format of the expanded selection list is "<User ID> / <User Name> -- <Subsidiary or Sub-account Name>". User name may be blank if it is not defined within the network. If a User ID is defined under a subsidiary or sub-account, the organization [a.k.a. customer] name is always displayed.
(3) Highlighted in blue, a tool-tip is displayed when you hover over a list item. It will state the organizational relationship to your own *** (see the Note below). The format is as follows:
<User ID> -- Name: <User Name> -- Customer: <Organization Name> [<Number>] -- Parent: <Parent Organization Name> [<Number>] -- Bill-to: <Bill-to Organization Name> [Number]
*** NOTE: The organization name and number, whether for the Customer or Parent or Bill-to labels, will be omitted when it is the same as the organization under which your User ID is defined. Referring to the example above, the label "Parent: Umbrella Corp." is omitted from the tool-tip because "Umbrella Corp." is the same account that owns the User ID used to login.
(4) Highlighted in red, a User ID that is closed within the network will be marked "(disabled)" in red. It provides you the ability to reference tickets that were created under a User ID that is now disabled.
Search Results Grid Columns

Like all Application Search Results grids, the records can be sorted by any column, columns can be hidden or un-hidden, and results can further be filtered by column. This application's grid adds an additional feature of expand / collapse icons that once clicked will display the ticket's body text. The columns from left to right are:
- Expand/Collapse icon: [highlighted in orange] Clicking this will toggle displaying/hiding the ticket's body text or problem description. See below for more.
- Ticket ID: This is the unique identifier of the ticket. You cannot filter the results by this column, but you can enter it into the search criteria to return only the one ticket in the results grid.
- Ticket Status: The possible status values you may see are: New, Accepted, Assigned, Work In Progress, Req Reassignment, Pending-User Feedback, Feedback Provided, Pending-Customer Feedback, Pending-Other, Resolved, Unsatisfactory Resolution, Closed, On Hold, Cannot be Resolved. Note: See "View Resolved/Closed/Defunct tickets" below regarding which ticket will normally be excluded. A filter of permissible enumerated values can be applied to this column.
- Description: This is either the text you entered as a "Short Description," or a description that was created on your behalf during a Trading Partner Relationship Add or Update action. This column can be filtered with a substring of your choosing to limit the records displayed.
- Create Date: This is the date the ticket was entered into the system. A number of date-based filter criteria can be applied to this column.
- Modified Date: This is the most recent date the ticket was modified. A number of date-based filter criteria can be applied to this column.
Only the Ticket Status column can be manually modified by Customer Service. All other fields are either fixed/read-only or automatically updated.
You may apply a search criteria to limit the results
- Enter a complete Ticket ID and press search. If that ticket exists, only one record will be returned in the Search Results grid. Partial Ticket ID strings are not permitted and will return no results.
- If your organization makes use of different contact e-mail addresses for specific provisioning actions or support request types, you may enter the appropriate e-mail address and submit the search to limit the results to just those with the matching reply-to e-mail address.
View Resolved/Closed/Defunct tickets too

You must check "Include Completed Requests" to see records marked On Hold | Resolved | Closed | Cannot be Resolved.
Records in one of these states will only be returned for 90 days. After 90 days, the record will no longer be returned from the back-end ticketing system.
View the Ticket Text, a.k.a. the Problem Description

Click the [+] icon to expand the row to display the Ticket text details submitted to Customer Support.
View the Ticket Details (read-only) and Read or Add Correspondence

Double-click row to load the full detail of the ticket and display it in the Ticket Entry/Edit form. Ticket details are read-only. You can see a history of e-mails Customer Support sent to you, and the e-mails you sent back to Customer Support that included the ticket number in the subject line. You may also add new correspondence directly from here instead of your e-mail client.