My Mailboxes Tab
- List, filter and sort all of your mailboxes.
- Clone a mailbox.
- Edit the details of a mailbox using the Edit Mailbox feature.
- Quickly pull up a detailed history of mailbox configuration activity.
My Mailboxes Overview
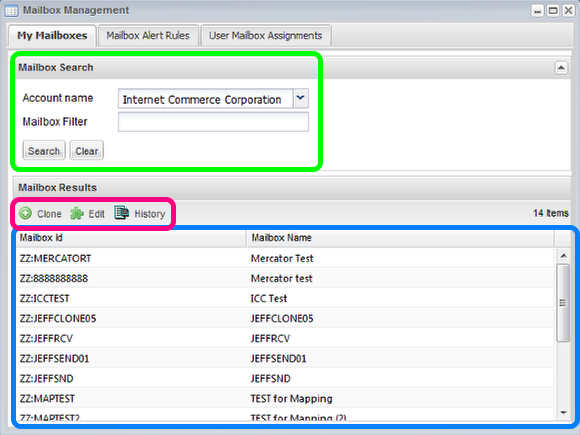
Within the Mailbox Management application is a tab for searching, cloning and editing mailboxes. Consistent with most Application forms, the My Mailboxes tab consists of:
-
A Request Criteria form to collect search parameters. Mailbox filter is optional and if empty will return all mailboxes under the specified account that are visible to the session user.
-
Action buttons to clone, edit, or show history of a VAN mailbox.
-
A Search Results Grid that displays mailboxes based on any provided search criteria. The grid currently displays only open mailboxes. Closed mailboxes
Clone Mailbox Overview
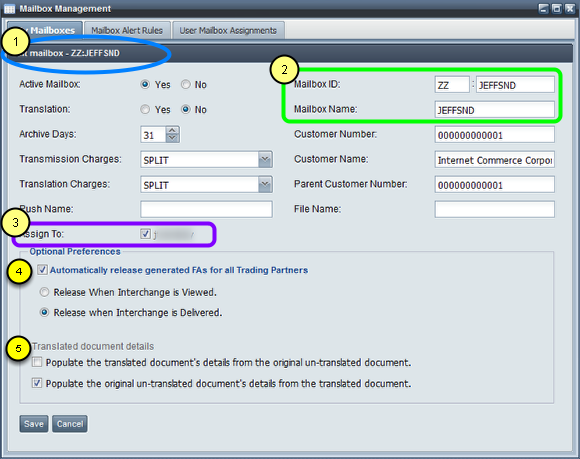
After selecting a mailbox and clicking the [ Clone ] button the above form will be presented and populated.
1 - The form heading will contain the Mailbox ID being cloned.
2 - Enter the new Qualifier, Mailbox ID and Mailbox Name. While Mailbox Name does not need to be unique the Qualifier+Mailbox ID must be. If the Qualifier+Mailbox ID already exists an error will be returned.
3 - The Assign To checkbox is optional. If checked the session user will be given access to the new mailbox upon a successful clone.
4 - By default, your mailbox will be configured to release FAs manually. That is, by selecting the corresponding interchange in the Document Manager and clicking the [ Send FA ] button. To enable automatic release of these FAs, check the Automatically release generated FAs for all Trading Partners checkbox. Doing so will expose the following two options:
- To configure your mailbox to automatically release the FA upon viewing, click the option labeled Release When Interchange is Viewed. Then the corresponding FA will automatically be released when you select an interchange in the Inbox of Document Manager and click the [ View ] button.
- To configure your mailbox to release the FA upon successfully downloading the corresponding interchange via FTP, select the option labeled Release when Interchange is Delivered. Then the corresponding FA will automatically be released once you successfully download an interchange using FTP.
5 - Translated document details control what values you see in the Document Manager when viewing a pre or post translated interchange.
- Populate the translated document's details from the original un-translated document. - For documents received (files in the INBOX) maintain and forward populate the document details.
- Populate the original un-translated document's details from the translated document. - For documents sent (files in the OUTBOX_ARCHIVE) update and back populate the document details.
*Note* Many of the fields on this form are read-only but may become editable in future releases.
*Note* Optional Preferences are ignored for non-translation enabled mailboxes.
After filling out the form click the [ Save ] button. If you have not yet filled out your profile you will be prompted for some additional information:
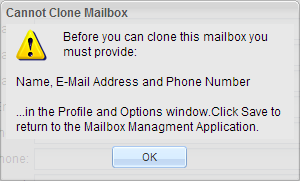

*For more information about filling out the profile form see the chapter on Profile and Options.
These profile fields are required because in some cases cloning a mailbox will require a ticket for Customer Service manual intervention. The following rules governing when manual intervention is necessary are largely based on the monthly mailbox fee structure:
Customer has > 1 mailbox, and only 1 mailbox has a fee:
- Clone OK
- Clone with NO fee
- Do not create a ticket
Customer has only 1 mailbox:
- Clone OK
- Clone with NO fee
- Create a ticket for CS to input fee if necessary per contract
Customer has > 1 mailbox and all have the same fee:
- Clone OK
- Clone the fee
- Do not create a ticket
Customer has > 1 mailbox, not all have the same fee:
- Clone OK
- Clone with NO fee
- Create a ticket for CS to perform the clone and address a possible fee discrepancy
All other cases:
- Do NOT clone
- Create a ticket for CS to perform the clone
If a ticket is generated you will receive the ticket number in a dialog message like this:
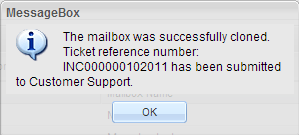
The ticket may then be viewed and tracked using the Support Ticket Center.
Edit Mailbox Overview
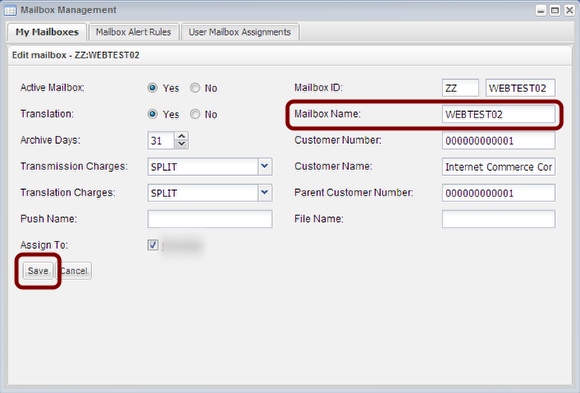
Currently the only editable field is Mailbox Name. This value may only contain printable ASCII characters.
Once the Mailbox Name has been edited, click the Save button to apply the change. The new Mailbox Name will be immediately reflected throughout the application.
Mailbox History
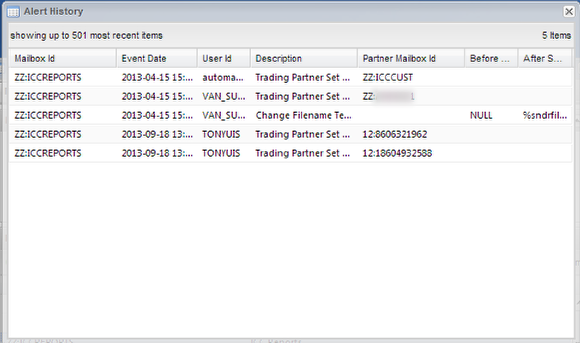
Clicking the [ History ] button will display a table of changes made to the selected mailbox record. The user Id VAN_SUPPORT represents a change made by Customer Service.
