Transaction Monitor
- Shows recent transaction summary activity with the most recent transactions floating to the top.
- This Monitor is highly customizable, allowing filtering and grouping of specific transaction activity.
Configure the Transaction Monitor
It is expected that you have already acquainted yourself with the two introductory Monitor pages, Monitors At Large and the Monitor Chooser. If you have not, please do so now to learn how we reached this point.
After double-clicking the monitor to put it into edit-mode, click the 'gear' icon [highlighted in green] to open the configuration window [highlighted in orange].
Transaction Monitor Configuration's field descriptions:
-
Label - This is the text to be displayed at the top of the widget. Its intended use is to briefly and clearly describe the widget's purpose. Which trading partner is the widget monitoring? Is there a Set_Type filter? How many hours does the widget monitor? A good Label will answer these questions so you can easily differentiate one TrxMonitor from another. Always update the Label when adjusting the monitor filters so the Label accurately describes the configuration.
-
Beginning <time selection in 15 minute increments> ago or All Today. There are 2 options for configuring the time frame in which the monitor will watch for transactions. The first is the Beginning dropdown. This provides a list of times from 00:15 to 23:45 in 15 minute increments. Selecting one of these values instructs the monitor to watch for transactions which appeared between the specified time and the current system time. For example, if you select 00:30 you are telling the monitor to only watch for transaction activity within the last half hour. The second option is the checkbox All Today. If this box is checked then the monitor watches for all activity between 12:01am and the current system time. Note that checking this box will disable the Beginning dropdown. If you wish to select from the Beginning dropdown, first you must uncheck this checkbox. *Hint* If you find 23:45 is not a long enough range of time, consider using the Reporter Application to run a Transaction Summary report.
-
Mailbox Filter - By default this checkbox is unchecked. Leaving the Mailbox Filter unchecked will result in the monitoring of ALL mailboxes available to the user. If you would like to use the Mailbox Filter, check the box to reveal the Mailbox Select field. Usage of this field is covered in detail here: Mailbox Select usage.
Filtering And Sort Order
- What do colored rows indicate? Blue means this is a new row and green signifies an existing row that was updated with newly received transactions. If no new transactions were found then there is no row background color applied. Records are sorted in descending order based on last received time.
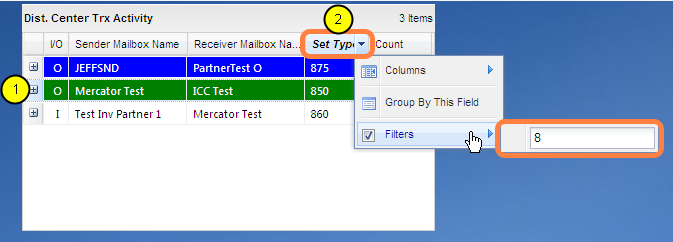
- Column Filters can be found throughout the B2B Management Center. Here in the Transaction Monitor they can be used to further refine your results. In the above example a Set Type filter of '8' has been applied, yielding only results where '8' appears anywhere in the Set Type. Text filters (like the one shown in the image) are not case sensitive and return partial matches.
A few more points about column filters:
- More than one column filter may be active at a time.
- Column filter values are saved to State. This means the next time you log in they will be automatically applied.
- Notice in the above image that the column heading Set Type is bold and italicized. This indicates that the column filter is active.
- It is the user's responsibility to keep the Label in sync with the column filters. For example, if you have a TrxMonitor with the Label, 'MyTP 810 Activity' and a Set_Type filter of '810' and you change the Set_Type filter to '997', then your Label is out of sync because it does not accurately describe the widget's configuration. After changing the column filter text, you would likely want to change the Label text to 'MyTP 997 Activity'.
Note: If you group on a filtered column, the filter will still be applied but there will be no visual indication that the filter is active. To avoid, we recommend not grouping on filtered columns.
Customizing the Grid Display
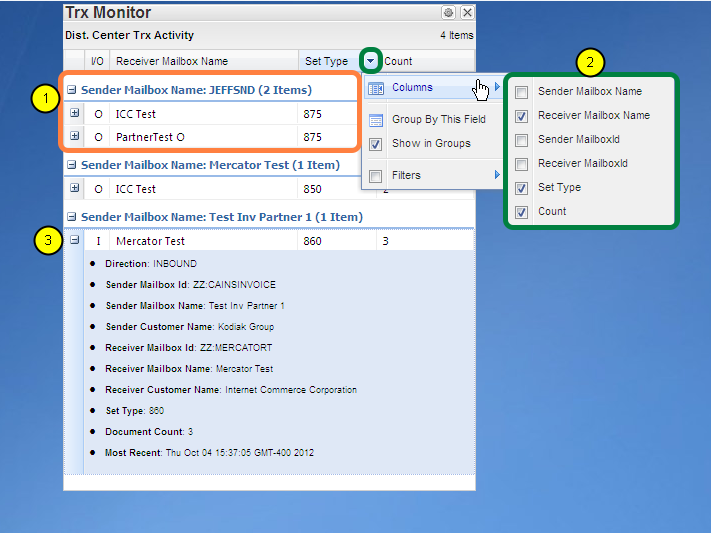
- Grouping - To group rows by value, select the Group By This Field option from the desired column header menu. This will display all rows with an exact matching value under a single collapsible group. In this example, the Sender Mailbox Name column is grouped. The two highlighted rows both contain "JEFFSND" as the Sender Mailbox Name. The only column that does not allow grouping is the Count column. The Groups themselves appear in ascending order. Notice in the image that the group of "JEFFSND" appears before "Mercator Test". This ordering will not change even if new transactions are found for "Mercator Test".
- Column Visibility - Showing or hiding columns. *Hint* Columns can also be reordered by left clicking and dragging the column header to a new position in the grid.
- Row Expander - Details about the transaction summary are viewable in line for any row by clicking the icon button in the first column.